Learning Adventure #4
Gary Stager's latest challenge involved purchasing MicroWorlds EX and using it to program LOGO turtles to decorate a piece of a digital quilt that we will assemble as a class. What a fun adventure! Although I was in school right around the time LOGO first took off, this was the first time that I got to program in a LOGO environment and I had a lot of fun in my first efforts.
I started by looking at the directions that Gary had provided on his web page. They are the quick and dirty introduction to MicroWorlds EX and teach one how to control the turtle, write some procedures, and build the frame in which the quilt pieces are to be decorated. I was left needing a little more understanding of how to create more complex shapes: lines are cool, but curves can be interesting, too. I opened MicroWorlds EX and completed the "Turtles and Geometry" unit, which was quite useful in helping me to understand how to get the turtle to create some interesting patterns.
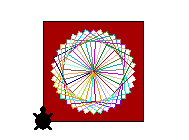
I ended up liking an arc-type shape that could be rotated as far as 360 degrees, or in my case, just 90 degrees. Separating the rays by ten degrees kept it from getting cluttered. The actual pattern I chose to create with the arcs and rays is one that I use frequently in the paper collages that I make; an example can be seen below. It is a motif that I explore and use often in my collages, so it was very exciting to be able to program a turtle to make it for me! I ended up creating four different sizes of rays that I could march across the frame without it leaving the frame. I also experimented with having the rays originate from all sides of the frame but the finished picture was too busy and complicated. I like the effect that the rays at the top and the bottom of the quilt produce, especially the surprise vertical lines created in the final design.
I experimented with using setc random 256 as a command in the patch procedure to generate a different colored patch every time; perhaps I will release that one, too. I decided on the blue, red, and white not out of French patriotism but rather because they produced a strong visual effect.
I look forward to experimenting with curves in some of my later turtles, as well as working with my mother, who is an accomplished quilter, to come up with some crazy complex patterns that are based on actual quilting patterns.
Detail of "A Brief History of Cheese"
My quilting turtle
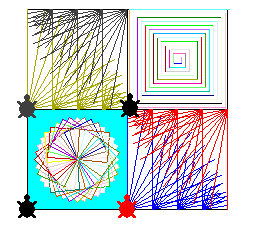
I took my original turtle and added a random setting to the colors that it is using when it paints its rays. It's awesome when combined with the click action; you click on the turtle and it will redraw in new colors! Try double-clicking the turtle to stop while it is facing in a random direction. Click it again to restart it aligned in a different direction: it will eventually create a design far outside what the original frame called for! Here is just one example:
A pattern created by starting and stopping the turtle
This turtle quilt pattern is based upon a procedure that is on the Logo Foundation's Logo Primer page:
I imagine the Pepperdine servers are not set up to properly serve the turtle files. I've set up a page on my .Mac account where you can download my turtles. Have at it!
The next part of the challenge was to construct a "quilt" using the patches that my classmates and I have created. I took a stab at the challenge and loaded four of my turtles into a board using the Import feature of MicroWorlds. I then used the Procedures Tab of the window as instructions entered here are global and can be used by all turtles. Here is my first attempt:
I was able to get the turtles to align themselves as part of the quilt procedure then had them run their patch procedure to draw their patches. The final result looks like a quilt!
I then wanted to load some other people's turtles into a board and use them to create a bigger quilt. I started by looking at the procedures people had used with their turtles. Some people had used the 'home' rule to return their turtles to their start point. The issue with this, as Gary Stager pointed out, is that 'home' refers to a position at 0,0 on the board, so if the turtle is not intended to be at point 0,0 at the end but it uses the home command, it will end up there.
After looking through the turtles I found nine candidates for quilt building. I started by listing the names of the turtles on a piece of paper. Below the list I drew a diagram of the start points for each of the turtles. One turtle would start at 0,0 while another started at 0, 100 for example. After drawing out the points I was able to assign individual turtles to those points, again still only on paper. Finally, I assigned the nine turtles individual places in the quilt and wrote the number I had assigned to the turtle next to its respective point.
I then used the Procedure window at the right side of the screen. Procedures written here will apply to all the turtles one might have on the board. I started the quilt procedure by assigning each of the turtles I was using a place on the board:
allenh, setpos [-100 100]
heatherBball, setpos [0 100]
mitch's, setpos [100 100]
kristend, setpos [-100 0]
joshb-flower, setpos [0 0]
joshb-spiral, setpos [100 0]
cherilynz, setpos [-100 -100]
robertm, setpos [0 -100]
allenh2, setpos [100, -100]
With the turtles in their correct places, I was then able to write procedures to make each of the turtles patch, which was a no-brainer because the patch procedure was already written for each of the turtles by the classmate who had created the turtle:
allenh, patch
heatherBball, patch
mitch's, patch
kristend, patch
joshb-flower, patch
joshb-spiral, patch
cherilynz, patch
robertm, patch
allenh2, patch
All of this code was arranged under a 'to quilt' procedure:
to quilt
allenh, setpos [-100 100]
heatherBball, setpos [0 100]
mitch's, setpos [100 100]
kristend, setpos [-100 0]
joshb-flower, setpos [0 0]
joshb-spiral, setpos [100 0]
cherilynz, setpos [-100 -100]
robertm, setpos [0 -100]
allenh2, setpos [100, -100]allenh, patch
heatherBball, patch
mitch's, patch
kristend, patch
joshb-flower, patch
joshb-spiral, patch
cherilynz, patch
robertm, patch
allenh2, patch
end
I was then able to go to the Command Center window at the bottom left and enter 'quilt.' The turtles arranged themselves and dragged their pens across the board in the process. Another piece of code was needed. It wasn't pretty or efficient, but it prevented me from needing to go in and start mucking with the procedure code in each of the turtles.
allenh, pu
heatherBball, pu
mitch's, pu
kristend, pu
joshb-flower, pu
joshb-spiral, pu
cherilynz, pu
robertm, pu
allenh2, pu
So long as we were doing that we would need to put the pen down again before we ran the patch procedure:
allenh, pd
heatherBball, pd
mitch's, pd
kristend, pd
joshb-flower, pd
joshb-spiral, pd
cherilynz, pd
robertm, pd
allenh2, pd
Again, there are much more graceful ways to accomplish this, but I was just brute-forcing it at this point.
Finally, the code was assembled:
to quilt
allenh, pu
heatherBball, pu
mitch's, pu
kristend, pu
joshb-flower, pu
joshb-spiral, pu
cherilynz, pu
robertm, pu
allenh2, pu
allenh, setpos [-100 100]
heatherBball, setpos [0 100]
mitch's, setpos [100 100]
kristend, setpos [-100 0]
joshb-flower, setpos [0 0]
joshb-spiral, setpos [100 0]
cherilynz, setpos [-100 -100]
robertm, setpos [0 -100]
allenh2, setpos [100, -100]allenh, pd
heatherBball, pd
mitch's, pd
kristend, pd
joshb-flower, pd
joshb-spiral, pd
cherilynz, pd
robertm, pd
allenh2, pdallenh, patch
heatherBball, patch
mitch's, patch
kristend, patch
joshb-flower, patch
joshb-spiral, patch
cherilynz, patch
robertm, patch
allenh2, patch
end
I went to the Command Center window and entered 'quilt.' Here is what the turtles did:
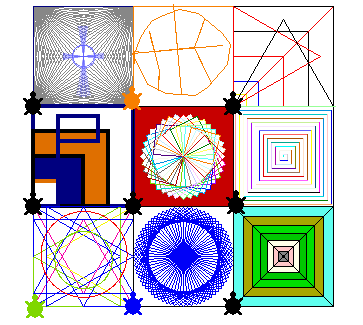
Eureka! Sometimes a couple of the turtles would get misaligned, so it actually took a couple tries to get the turtles to line up all facing '0' and then execute their patch procedure. The finished product is symbolic of the help we gave one another as we worked on this Learning Adventure!
